

Hello and welcome to post 6 of the Itch to Stitch Salamanca sew along. In this post we are looking at steps 15 through 22 in our pattern instructions. I stayed up late Thursday night to get caught up on my lined version and to be able to post on Friday. But I ended up judging a mock trial and having to do some things for our college girl most of the day, had to work earlier today and so have only been able to put the final editing on this post in the last couple hours! So sorry for the delay but you had an extra day to catch up!
Mid week last week I actually started completely from scratch on my lined version because I got to thinking about when and where I would use the jacket and determined it would most likely be in to the fall. That being said, I am trying really hard to shed some unwanted pounds right now (5 down, woohoo!!) and know that a size 12 is right where I need to be currently so…. I decided to sew a size 10. It is a gamble folks but one I am willing to take because if you are aware of my fabric stash, you know I have LOTS of choices should I need to remake the jacket due to sizing. But I won’t need to as I am feeling particularly determined. 🙂 🙂
But on to the sew along. If you haven’t already, now is a good time to start thinking about your front closures. My lined version will be my third Salamanca but the first one I plan to have button closures. Truth. I struggle with buttonholes. I have a wonderful machine that makes beautiful button holes…on the practice fabric, but I have yet to make a single buttonhole on a real garment that I have been satisfied with or did not have to unpick. I know I am not alone in my woes (Crystal). So frankly, I am terrified.
Over spring break my daughter traveled to New York City. Before she left I told her “if you happen across a big button with a needle coming out of it, give me a call”.

At 6:30 pm on a Saturday night she texts me a picture of the big button and they are standing in front of Pacific Trimming!
What else is there for her to do but go in! 15 minutes and $50 later she texts me “SCORE!” and brings home various buttons and 5 yards of the most beautiful red Petersham. It’s the little things you know. So I have no excuse, my lined Salamanca must have buttons. I plan only one large top button for the unlined version.
Step 15 has us sewing our facings together and 16 applying them to our lining. Make sure you match up notches correctly in these steps.

From there move to the front centers and with right sides together pin your lining to your main panel. Again, match your notches. Here you will find excess fabric. That is correct. This type of lining is called a jump lining and allows for movement when wearing. I wish I had known about jump linings when I sewed my daughter’s wool coat last year. It is my humble opinion all coat linings should have this excess.

This is what it looks like after pinning.
Sew the front edges together starting from the bottom and sew to the top.
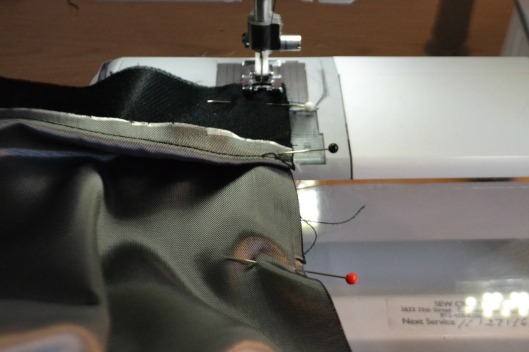
Fold back the front edges at the fold lines. Now sew the main jacket and lining right sides together at the hem edge. Turn your jacket right side out. Understitch as directed in step 22. Kennis has a nice picture tutorial on page 13 of understitching.
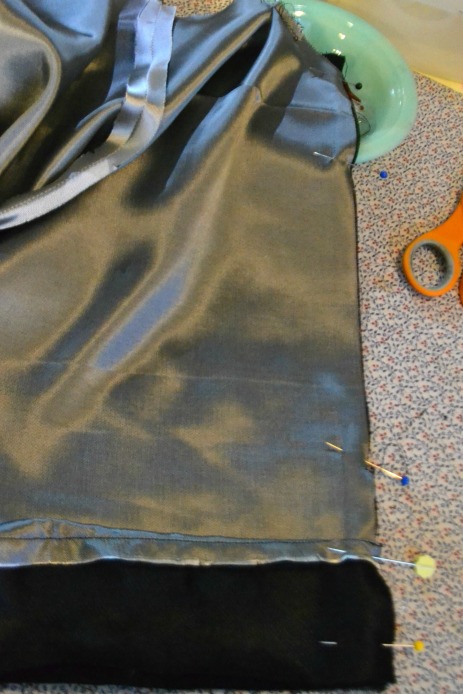
Front edge has been turned back on fold line. Main and lining pieces pinned at bottom edge.
And that is it for today! Now you have a whole week to catch up. Next Friday, we will sew sleeves and attach our yoke.
Here’s mine so far.

A reminder: Kennis has graciously offered up a couple of prizes from her shop and will be available to answer questions via her fb page. To be eligible for the prize, you must complete the sew along. Also, she is offering 20% off the Salamanca pattern for those who want to sew along. Discount code is: salamancasal and is valid until 4/15/16. Pattern is available here.
March 16th – Introductory Post
March 18th – Determining size, preparing pattern, fabric choices Post
March 23rd – Making a muslin and adjusting fit issues Post
March 25th – Cutting fashion fabric, applying interfacing, preparing to sew Post
March 30th – Sew outer shell, sew lining shell Post
April 1st (2nd) – Attaching hem facing, sewing lining to outer shell
April 8th – Sleeves, attaching yoke
April 13th – Adding closures
April 20th – Gallery of finishes, prizes awarded!
See you on Friday!
P.S. Come join us for sew a long fun at Sewalongs and Sewing Contest fb page! A fun group of sewists who come together quarterly to sew seasonal wardrobe pieces! Oh, and there are prizes!

OMG, it’s not just me with the button hole thing!? Thank GOODNESS!
LikeLike
I can’t believe you are making a size smaller. Very determined girl! Now you have to succeed with this jacket waiting for you. 🙂
LikeLiked by 1 person
Pingback: Salamanca Post 7 (early!) Sleeves and Collars | Stoney Sews
I’m finally caught up to this post today!
LikeLike